
DNS서버에 접속하여 도메인 주소를 입력하면 해당 IP 주소를 반환하는 소스이다. CircuitPython 환경아래에서 제작했으며 Python코드로 구성되어 있다.
Overview
W5100S은 Ethernet Controller 칩의 하나로 TCP/IP 프로토콜이 하드웨어 로직으로 구현되어 있어 칩 레벨에서 프로토콜 처리를 할 수 있다. W5100S를 라즈베리 파이 피코와 호환하는 보드이며 3.3V 5V와 8개 GND 핀을 지원한다.
W5100S에 대한 자세한 내용은 이 링크를 참조.
- Raspberry Pi Pico Pin-Compatible
- Ethernet (W5100S Hardwired TCP/IP CHIP)
- Product page : https://docs.wiznet.io/Product/iEthernet/W5100S/overview
- Support 4 Independent Hardware SOCKETs simultaneously
- Support SOCKET-less new Command: ARP-Request, PING-Request
- Support Auto-MDIX only when Auto-Negotiation mode


RP2040 Datasheet - https://www.raspberrypi.org/documentation/microcontrollers/raspberry-pi-pico.html
Raspberry Pi Documentation - Raspberry Pi Pico
The official documentation for Raspberry Pi computers and microcontrollers
www.raspberrypi.com

준비하기
Prepare Hardware
1. 라즈베리피코와 WIZNet Ethernet HAT을 결합한다.
2. Micro 5 pin 케이블을 이용하여 Raspberry Pi Pico와 PC를 연결하여준다.
3. Ethernet cable을 Ethernet HAT에 있는 포트에 연결하여 링크 LED가 들어오는 지 확인한다.
- W5100S-EVB-PICO 보드를 사용하게 된다면 (1.내용을 생략하면 된다.)


Prepare Software
1.Installing CircuitPython
아래 링크를 참조하여 Raspberry pi Pico에 CircuitPython을 설치하여 준다.
https://learn.adafruit.com/getting-started-with-raspberry-pi-pico-circuitpython/circuitpython
Getting Started with Raspberry Pi Pico and CircuitPython
The Raspberry Pi foundation changed single-board computing when they released the Raspberry Pi computer, now they're ready to do the same for microcontrollers with the release of the brand new Raspberry Pi Pico.
learn.adafruit.com
- Download the below uf2 file link on your computer
CircuitPython 7.0.0 - https://downloads.circuitpython.org/bin/raspberry_pi_pico/en_US/adafruit-circuitpython-raspberry_pi_pico-en_US-7.0.0.uf2

2.Setup WIZnet Ethernet wiznet5k Library
wiznet5k 라이브러리를 가져와 Pico 내부에 있는 lib폴더에 복사하여 준다. 자세한 환경설정은 CircuitPython에서 설명하고있다. 시작하기 전 lib 폴더에 다음 사진과 같은 폴더가 있는 지 확인하면 환경설정은 끝이다.
https://github.com/Wiznet/RP2040-HAT-CircuitPython
GitHub - Wiznet/RP2040-HAT-CircuitPython
Contribute to Wiznet/RP2040-HAT-CircuitPython development by creating an account on GitHub.
github.com
adafruit_bus_device
adafruit_wiznet5k

시작하기
1.Install Programs
Teraterm은 터미널 콘솔프로그램이며 PC와 사용자가 통신할 수 있게 도와주는 인터페이스이다. 주목적은 시리얼 통신 목적으로 사용하게 된다.
Download File List - Tera Term - OSDN
Download File List - Tera Term #osdn
osdn.net
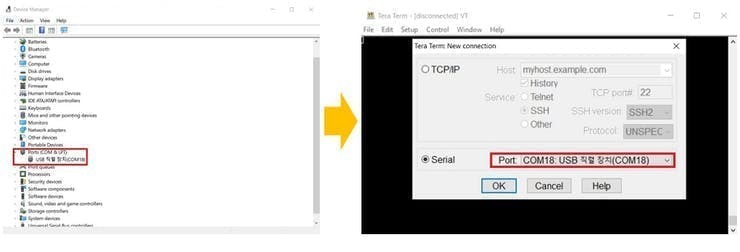
"장치관리자"를 열어 해당 포트가 몇번포트로 열려있는 지 확인한다. 이후 해당 COM포트로 Teraterm을 통해 라즈베이파이 피코와 연결한다.
2. How to DNS Example
WIZnet github에 접속하여 CircuitPython DNS 소스를 가져와 피코 내부에 있는 code.py에 복사한다.
Setup DNS Example
download - https://github.com/Wiznet/RP2040-HAT-CircuitPython/tree/master/examples/DNS
GitHub - Wiznet/RP2040-HAT-CircuitPython
Contribute to Wiznet/RP2040-HAT-CircuitPython development by creating an account on GitHub.
github.com

터미널창에서 "Ctrl+D" 를 누르게 되면 피코가 실행된다. 터미널에서 실행되는 메세지는 다음과 같다. 반대로 "Ctrl+C"를 누르게 되면 실행 중인 소스가 멈추게 된다.
서버의 도메인 URL에 액세스하여 IP 주소로 변환한다.

WIZnet/RP2040 gitub source
이밖에 다른 예제를 확인하려면 아래 링크에 있는 WIZnet github에 접속하여 다양한 프로토콜 예제를 확인할 수 있다.
https://github.com/Wiznet/RP2040-HAT-CircuitPython
GitHub - Wiznet/RP2040-HAT-CircuitPython
Contribute to Wiznet/RP2040-HAT-CircuitPython development by creating an account on GitHub.
github.com
'IT' 카테고리의 다른 글
| WizFi360 :: [ MicroPython ] :: 메세지 전송하기 (0) | 2022.09.19 |
|---|---|
| WIZnet Ethernet HAT[RP2040] + HTTP WebClient 구축하기 (0) | 2021.10.25 |
| WIZnet Ethernet HAT[RP2040] + HTTP WebServer 구축하기 (0) | 2021.10.25 |
| WIZnet Ethernet HAT[RP2040] SNTP 시간 프로토콜 진행하기 (0) | 2021.10.25 |
| WIZnet Ethernet HAT[RP2040] Loopback Test 진행하기 (0) | 2021.10.25 |


