TCP/IP를 통해 소켓(SOCKET) 통신 구축.
개념 설명
*프로토콜(PROTOCOL)
프로토콜은 원래 외교상의 언어로써 의례나 국가간의 약속을 의미하며, 통신에서는 어떤 시스템이 다른 시스템과 통신을 원할하게 수용하도록 해주는 통신 규약, 약속
*IP
전 세계 컴퓨터에 부여된 고유의 식별 주소
*포트(PORT)
포트는 네트워크 상에서 통신하기 위해 호스트 내부적으로 프로세스가 할당받아야 하는 고유한 숫자. 한 호스트 내에서 네트워크 통신을ㅇ 하고 있는 프로세스를 식별하기 위해 사용되는 값이므로 같은 호스트 내에서 서로 다른 프로세스가 같은 포트 넘버를 가질 수 없다. 즉, 같은 컴퓨터 내에서 프로그램을 식별하는 번호이다.


1. Overview

Wiznet W5500 Ethernet Sheiled(Raspberry Pi Pico) Reference
W5500 Ethernet Shield는 SPI 인터페이스로 동작
http://wizwiki.net/wiki/doku.php/products:w5500:start
products:w5500:start [Document Wiki]
wizwiki.net
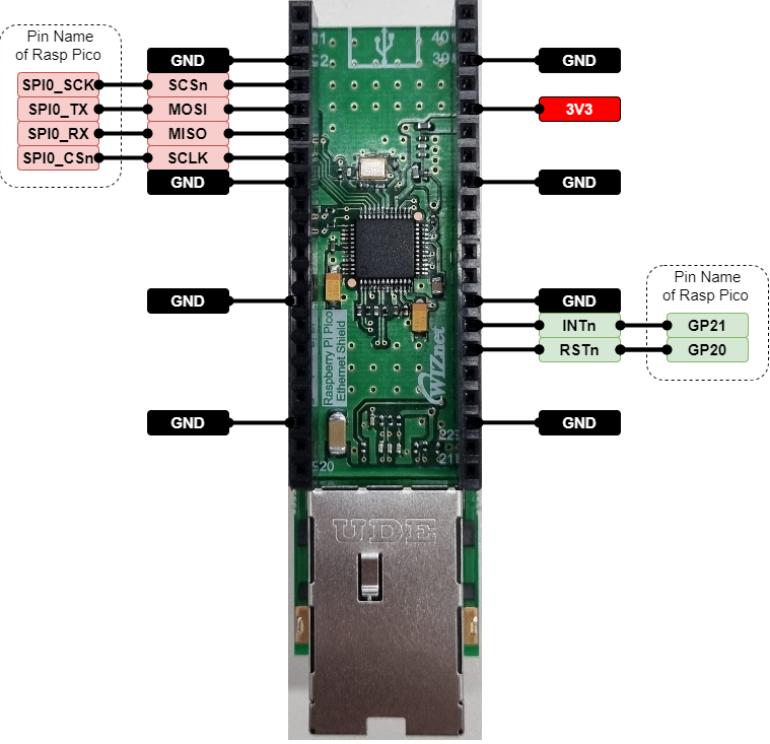
Raspberry Pi Pico와 w5500 Ethernet Shield 결합

Wiznet WizFi360-EVB-Mini(Raspberry Pi Pico) Reference
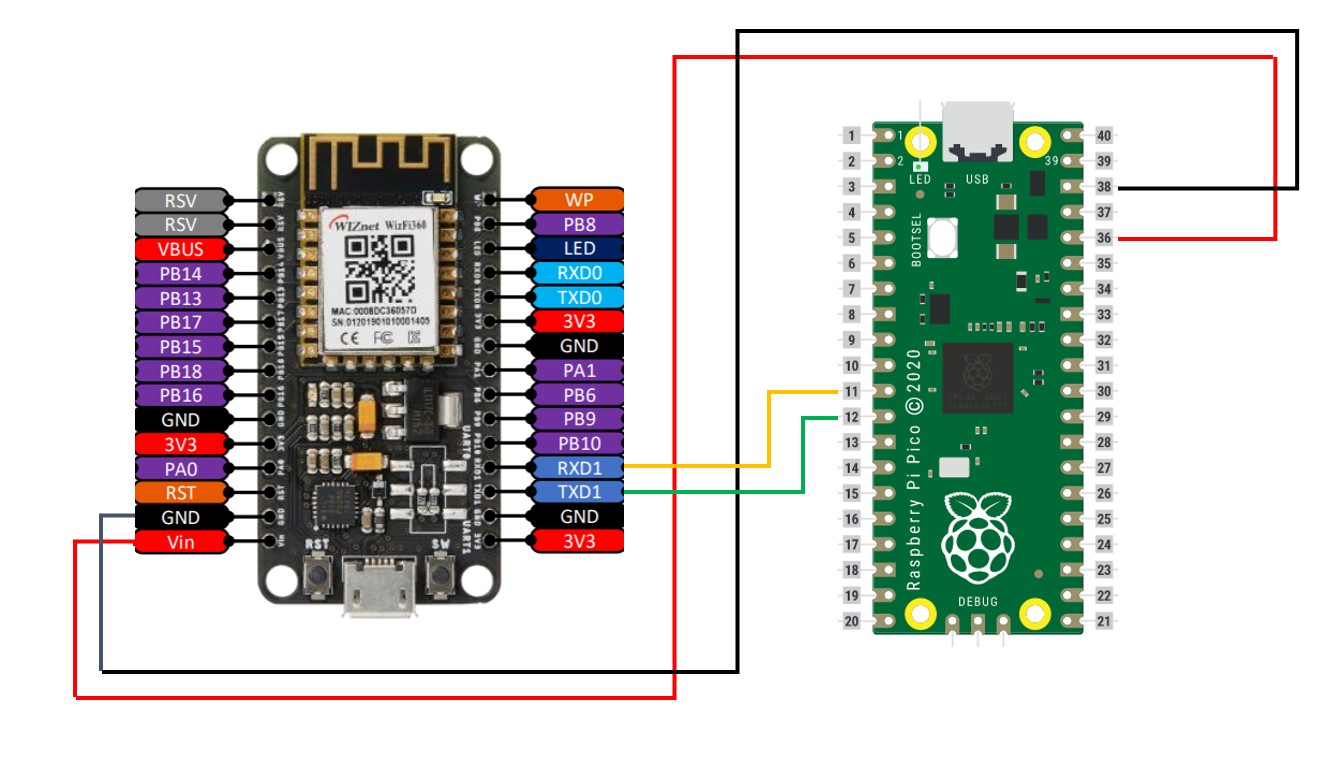
WIzFi360은 UART & AT command로 동작
https://wizwiki.net/wiki/doku.php/products:wizfi360:start
products:wizfi360:start [Document Wiki]
wizwiki.net

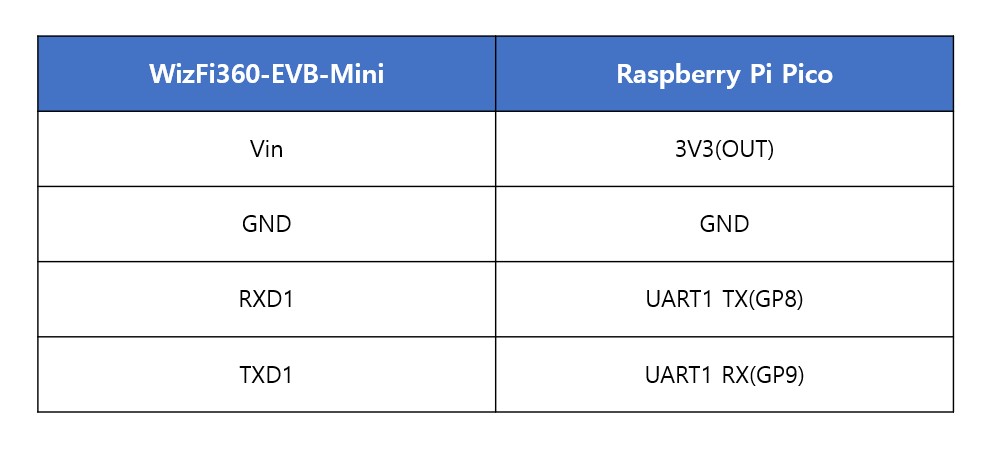
Raspberry Pi Pico 와 WizFi360 핀 연결
Raspberry Pi Pico Pin map

2. TCP Client(WizFi360)에서 온도를 측정해 TCP Server(w5500)으로 데이터 전송
w5500 TCP server
W5500환경은 하기 블로그를 참조
https://iotedition.tistory.com/2
Raspberry Pi Pico + WIZ850io(W5500) Ethernet 환경 구성하기 - (1)
Hardware 구성 + Circuitpython 설치 Raspberry pi Pico에 CircuitPython 설치하기. https://learn.adafruit.com/getting-started-with-raspberry-pi-pico-circuitpython/micropython-or-circuitpython Getting..
iotedition.tistory.com
| import board import busio import digitalio import time from adafruit_wiznet5k.adafruit_wiznet5k import WIZNET5K import adafruit_wiznet5k.adafruit_wiznet5k_socket as socket SPI0_SCK = board.GP2 SPI0_TX = board.GP3 SPI0_RX = board.GP4 SPI0_CSn = board.GP5 W5500_RSTn = board.GP20 print("Wiznet5k Ping Test (DHCP)") # Setup your network configuration below # random MAC, later should change this value on your vendor ID MY_MAC = (0x00, 0x01, 0x02, 0x03, 0x04, 0x05) IP_ADDRESS = (192, 168, 1, 100) SUBNET_MASK = (255, 255, 255, 0) GATEWAY_ADDRESS = (192, 168, 1, 1) DNS_SERVER = (8, 8, 8, 8) led = digitalio.DigitalInOut(board.GP25) led.direction = digitalio.Direction.OUTPUT ethernetRst = digitalio.DigitalInOut(W5500_RSTn) ethernetRst.direction = digitalio.Direction.OUTPUT # For Adafruit Ethernet FeatherWing cs = digitalio.DigitalInOut(SPI0_CSn) # For Particle Ethernet FeatherWing # cs = digitalio.DigitalInOut(board.D5) spi_bus = busio.SPI(SPI0_SCK, MOSI=SPI0_TX, MISO=SPI0_RX) # Reset W5500 first ethernetRst.value = False time.sleep(1) ethernetRst.value = True # Initialize ethernet interface with DHCP # eth = WIZNET5K(spi_bus, cs) # Initialize ethernet interface without DHCP eth = WIZNET5K(spi_bus, cs, is_dhcp=True, mac=MY_MAC) # Set network configuration eth.ifconfig = (IP_ADDRESS, SUBNET_MASK, GATEWAY_ADDRESS, DNS_SERVER) print("Chip Version:", eth.chip) print("MAC Address:", [hex(i) for i in eth.mac_address]) print("My IP address is:", eth.pretty_ip(eth.ip_address)) # Initialize a socket for our server socket.set_interface(eth) server = socket.socket() # Allocate socket for the server server_ip = None # IP address of server server_port = 5000 # Port to listen on server.bind((server_ip, server_port)) # Bind to IP and Port server.listen() # Begin listening for incoming clients conn, addr = server.accept() # Wait for a connection from a client. print("socket connected") while True: led.value = not led.value time.sleep(1) with conn: # data = conn.recv() # print(data) # conn.send(data) # Echo message back to client while True: data = conn.recv(10) if data: print('received', data) conn.send(data) # Echo message back to client #break print("Done!") server.socket.close() |
WizFi360 TCP Client
W5500환경은 하기 블로그를 참조
https://iotedition.tistory.com/4
WizFi360-EVB-Mini 무선 모듈 + AT command
Wizfi360 와이파이 모듈 기반의 미니 EVB보드 https://wizwiki.net/wiki/doku.php/products:wizfi360:board:wizfi360-evb-mini:start products:wizfi360:board:wizfi360-evb-mini:start [Document Wiki] wizwiki.n..
iotedition.tistory.com
| import os, sys import utime from machine import UART,Pin print(os.uname()) #LED led = machine.Pin(25, machine.Pin.OUT) led.value(0) utime.sleep(0.5) led.value(1) #Temperature sensor_temp = machine.ADC(4) conversion_factor = 3.3 / (65535) #Uart #uart = machine.UART(0, baudrate=115200, tx=Pin(0), rx=Pin(1)) uart = machine.UART(1, baudrate=115200, tx=Pin(8), rx=Pin(9)) print("UART Setting...") print(uart) #Functions def sendCMD_waitResp(cmd, timeout=3000): print("CMD: " + cmd) uart.write(cmd.encode('utf-8')) waitResp(timeout) print() def waitResp(timeout): prvMills = utime.ticks_ms() resp = b"" while (utime.ticks_ms()-prvMills) < timeout: if uart.any(): resp = b"".join([resp, uart.read(1)]) print(resp) #AT command Test sendCMD_waitResp("AT\r\n") #AT sendCMD_waitResp("AT+GMR\r\n") #firmware ver utime.sleep(0.5) sendCMD_waitResp("AT+RST\r\n") #reset sendCMD_waitResp("AT+CWMODE_CUR=1\r\n") # Station Mode sendCMD_waitResp("AT+CWDHCP_CUR=1,1\r\n") #DHCP utime.sleep(0.5) sendCMD_waitResp('AT+CWJAP_CUR="SSID","PASSWORD"\r\n') #AP connecting sendCMD_waitResp("AT+CIPSTA_CUR?\r\n") #network chk #TCP Client sendCMD_waitResp("AT+CIPMUX=1\r\n") sendCMD_waitResp('AT+CIPSTART=1, "TCP","192.168.1.100",5000\r\n') print("connected...") print("RPi-PICO with WizFi360") Data = bytes() while True: reading = sensor_temp.read_u16() * conversion_factor temperature = 27 - (reading - 0.706)/0.001721 print(temperature) temp = str(temperature) utime.sleep(2) sendCMD_waitResp("AT+CIPSENDBUF=1,20\r\n") sendCMD_waitResp("Temperature: ") send = uart.write(temp.encode('utf-8')) |
3. Client에서 Server로 온도 측정 데이터 전송.


'IT' 카테고리의 다른 글
| WIZnet W5500 Chip Freezing Test (0) | 2021.08.02 |
|---|---|
| AX2 - WIZnet TCP/UDP 속도 측정 Tool (0) | 2021.07.09 |
| 라즈베리 파이 피코 Raspberry Pi Pico + WizFi360-EVB-Mini 로 WiFi Network 구축 (0) | 2021.06.15 |
| WizFi360-EVB-Mini 무선 모듈 + AT command (0) | 2021.06.08 |
| Raspberry Pi Pico + WIZ850io(W5500) Ethernet 환경 구성하기 - (2) (0) | 2021.06.03 |


